
React 生命周期
React 生命周期
类组件生命周期
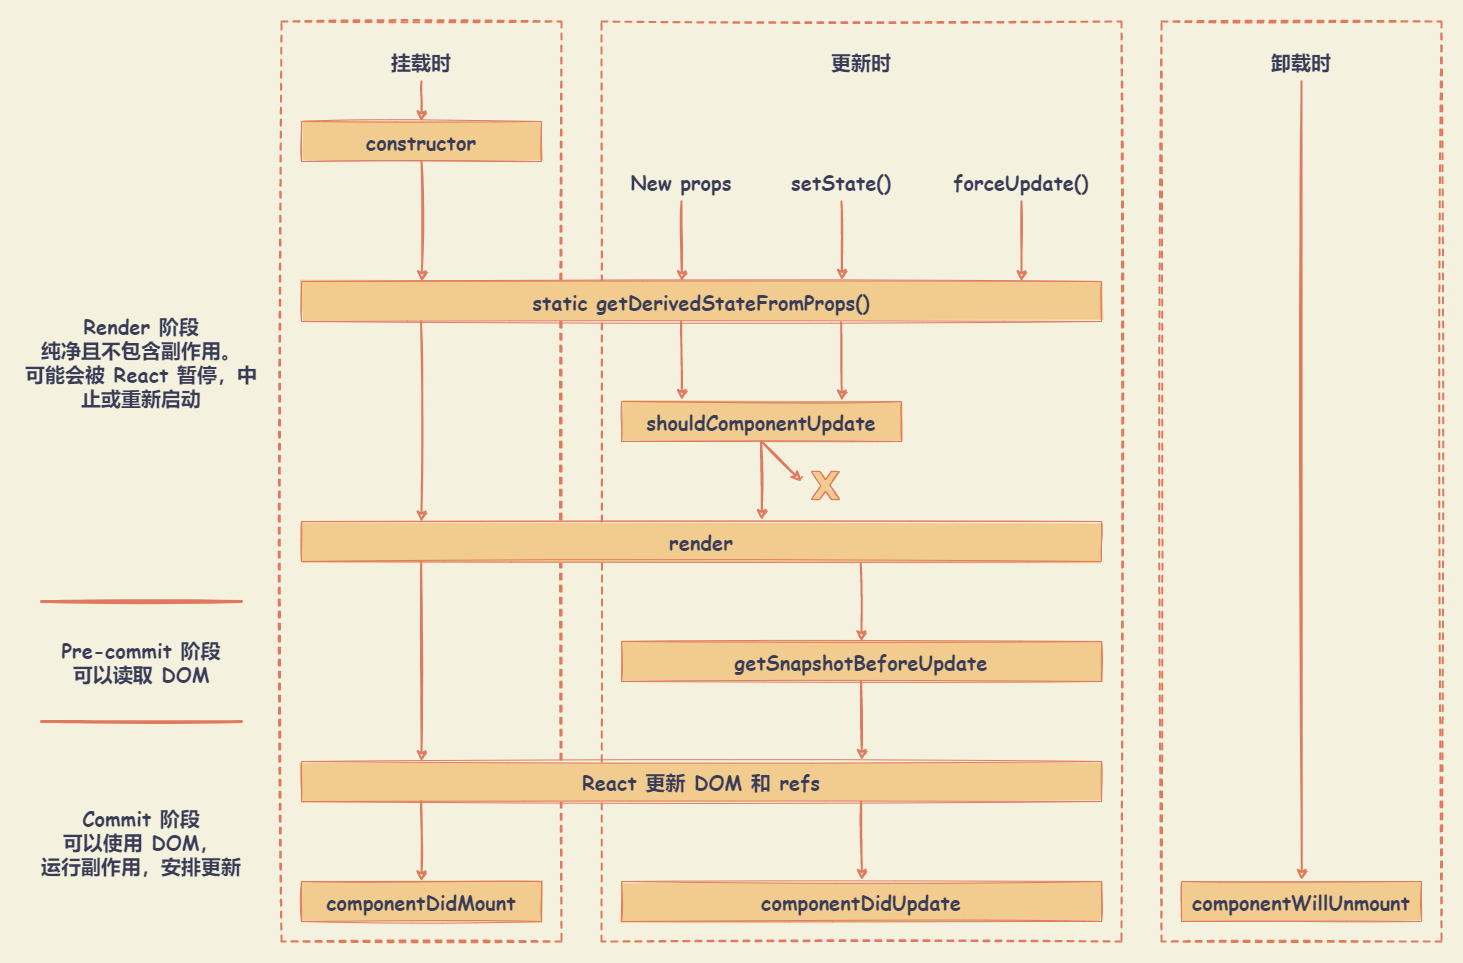
React 生命周期图示: https://projects.wojtekmaj.pl/react-lifecycle-methods-diagram
constructor
在 React 组件挂载之前,会调用它的构造函数。在为 React.Component 子类实现构造函数时,应在其他语句之前调用 super(props)。
constructor 构造函数作用:
- 初始化
state。比如,可以用来截取路由中的参数,赋值给state。 - 对类组件的事件进行处理。比如,绑定
this、节流、防抖等。 - 对类组件进行一些必要生命周期的劫持,渲染劫持,该功能更适合反向继承的 HOC。
class ExampleComponent extends React.Component {
  constructor(props) {
    // 执行 super , 在接下来的上下文中,获取到 props
    super(props)
    // 初始化 state : 通过给 this.state 赋值对象来初始化内部 state
    this.state = { counter: 0 }
    // 绑定 this : 为事件处理函数绑定实例
    this.handleAddClick = this.handleAddClick.bind(this)

    // 【禁止】不要在 constructor 构造函数中调用 this.setState()
    // 【禁止】避免将 props 的值复制给 state ,可以修改 props 值的 key
    // this.state = { color: props.color } // 避免 !!!
    // this.state = { email: props.defaultEmail } // 可修改 props 值的 key
  }

  handleAddClick() {
    console.log('【add】 handleClick')
    this.setState({ counter: this.state.counter + 1 })
  }

  // 使用箭头函数,可以不为事件处理函数绑定实例
  handleMinusClick = () => {
    console.log('【minus】 handleClick')
    this.setState({ counter: this.state.counter - 1 })
  }

  render() {
    return (
      <div>
        <div>counter : {this.state.counter}</div>
        <button onClick={this.handleAddClick}> add click </button>
        <button onClick={this.handleMinusClick}> minus click </button>
      </div>
    )
  }
}
getDerivedStateFromProps
getDerivedStateFromProps(props, state) 生命周期函数
- 该函数应该返回一个对象来更新
state,如果返回null则不更新任何内容 - 该函数存在只有一个目的:让组件在
props变化时更新state - 该函数在调用
render方法之前调用,并且在初始挂载及后续更新时都会被调用 - 该函数无权访问到组件实例。可以通过提取组件
props的纯函数及class之外的状态,在getDerivedStateFromProps()和其他class方法之间重用代码。
遵循有保守使用派生 state 规则。getDerivedStateFromProps() 适用于罕见的用例,即 state 的值在任何时候都取决于 props。
【Demo】基于 props 更新 state
class ExampleComponent extends React.Component {
  // 在构造函数中初始化 state,或者使用属性初始化器。
  state = {
    isScrollingDown: false,
    lastRow: null,
  }

  static getDerivedStateFromProps(props, state) {
    if (props.currentRow !== state.lastRow) {
      return {
        isScrollingDown: props.currentRow > state.lastRow,
        lastRow: props.currentRow,
      }
    }

    // 返回 null 表示无需更新 state
    return null
  }
}
【Demo】props 更新时获取外部数据
class ExampleComponent extends React.Component {
  state = {
    externalData: null,
  }

  static getDerivedStateFromProps(props, state) {
    // 保存 prevId 在 state 中,以便我们在 props 变化时进行对比。
    // 清除之前加载的数据(这样我们就不会渲染旧的内容)。
    if (props.id !== state.prevId) {
      return {
        externalData: null,
        prevId: props.id,
      }
    }

    return null // 无需更新 state
  }

  componentDidMount() {
    this._loadAsyncData(this.props.id)
  }

  componentDidUpdate(prevProps, prevState) {
    if (this.state.externalData === null) {
      this._loadAsyncData(this.props.id)
    }
  }

  componentWillUnmount() {
    if (this._asyncRequest) {
      this._asyncRequest.cancel()
    }
  }

  render() {
    if (this.state.externalData === null) {
      // 渲染加载状态 ...
    } else {
      // 渲染真实 UI ...
    }
  }

  _loadAsyncData(id) {
    this._asyncRequest = loadMyAsyncData(id).then(externalData => {
      this._asyncRequest = null
      this.setState({ externalData })
    })
  }
}
大部分使用派生 state (derived state,即:一个组件的 state 中的某个数据来自外部)导致的问题,不外乎两个原因:
- 直接复制
props到state上 - 如果
props和state不一致就更新state
派生 state 会导致代码冗余,并使组件难以维护。相关场景可使用一下替代方案:
- 需要执行副作用(例如,数据提取或动画)以响应
props中的更改,可改用componentDidUpdate生命周期。 - 使用
componentWillReceiveProps仅在prop更改时重新计算某些数据,可使用 memoization helper 代替。 - 使用
componentWillReceiveProps是为了在prop更改时,“重置”某些state,可使用组件 完全受控 或 使用 key 使组件完全不受控 代替。
受控 和 非受控 通常用来指代表单的 inputs,但是也可以用来描述数据频繁更新的组件。
- 用
props传入数据的话,组件可以被认为是受控(因为组件被父级传入的props控制) - 数据只保存在组件内部的
state的话,是非受控组件(因为外部没办法直接控制state)
render
class ExampleComponent extends React.Component {
  constructor(props) {
    // 执行 super , 在接下来的上下文中,获取到 props
    super(props)
  }

  render() {
    return (
      <div>
        <div>Hello World!!!</div>
        <MyComponent />
      </div>
    )
  }
}
render() 方法是 class 组件中唯一必须实现的方法。
当 render 被调用时,它会检查 this.props 和 this.state 的变化并返回以下类型之一:
React 元素。通常通过 JSX 创建,无论是 DOM 元素还是自定义组件均为 React 元素。
class ExampleComponent extends React.Component {
  render() {
    return (
      <div>
        <div>Hello World!!!</div>
        <MyComponent />
      </div>
    )
  }
}
数组或
fragments。 使得render方法可以返回多个元素。class ExampleComponent extends React.Component { render() { return ( // <React.Fragment></React.Fragment> 也可以使用新的短语法 <></> <React.Fragment> <ChildA /> <ChildB /> <ChildC /> </React.Fragment> ) } }Portals。可以渲染子节点到不同的 DOM 子树中。使用 Portals 渲染一个 Modal 组件
const modalRoot = document.getElementById('modal-root')

class Modal extends React.Component {
  constructor(props) {
    super(props)
    this.el = document.createElement('div')
  }

  componentDidMount() {
    // 在 Modal 的所有子元素被挂载后,
    // portal 元素会被嵌入到 DOM 树中,意味着子元素将被挂载到一个分离的 DOM 节点中。
    // ====================
    // 如果要求子组件在挂载时可以立刻接入 DOM 树,
    // 例如,衡量一个 DOM 节点,或者在后代节点中使用 'autoFocus',
    // 则需添加 state 到 Modal 中,仅当 Modal 被插入 DOM 树中才能渲染子元素。
    modalRoot.appendChild(this.el)
  }

  componentWillUnmount() {
    modalRoot.removeChild(this.el)
  }

  render() {
    // ReactDOM.createPortal(child, container) 提供了一种将子节点渲染到存在于父组件以外的 DOM 节点
    // > child : 是任何可渲染的 React 子元素,例如一个元素,字符串或 fragment
    // > container : 一个 DOM 元素
    return ReactDOM.createPortal(this.props.children, this.el)
  }
}

class ExampleComponent extends React.Component {
  constructor(props) {
    super(props)
    this.state = {
      isShowModal: false,
    }
  }

  handleShowModal = () => {
    this.setState({ isShowModal: true })
  }
  handleHideModal = () => {
    this.setState({ isShowModal: false })
  }

  render() {
    const renderModal = () => {
      return (
        <Modal>
          <div>modal content</div>
          <button onClick={this.handleHideModal}>Hide Modal</button>
        </Modal>
      )
    }

    return (
      <div>
        <button onClick={this.handleShowModal}>Show Modal</button>
        {this.state.isShowModal ? renderModal() : null}
      </div>
    )
  }
}
字符串或数值类型。在 DOM 中会被渲染为文本节点。
布尔类型或
null。什么都不渲染。
注:如果 shouldComponentUpdate() 返回 false,则不会调用 render()。
componentDidMount
componentDidMount() 会在组件挂载后(插入 DOM 树中)立即调用。
- 可以处理一些关于 DOM 操作,比如基于 DOM 的事件监听器。
- 通过网络请求获取数据,渲染视图。
- 添加订阅。如果添加了订阅,记得在
componentWillUnmount()里取消订阅。
class ExampleComponent extends React.Component {
  componentDidMount() {
    /* 延时器 */
    this.timer = setTimeout(() => {
      console.log('componentDidMount timer')
    }, 3000)

    /* 事件监听 */
    this.divDomRef.current.addEventListener('click', this.handlerClick)

    /* 数据请求 */
    this.fetchData()
  }

  componentWillUnmount() {
    clearTimeout(this.timer) /* 清除延时器 */

    /* 卸载事件监听器 */
    this.node.removeEventListener('click', this.handlerClick)
  }

  handlerClick = () => {}

  fetchData = () => {}

  render() {
    this.divDomRef = React.createRef()

    return (
      <div>
        <div ref={this.divDomRef}>Hello World!!!</div>
      </div>
    )
  }
}
在 componentDidMount() 里直接调用 setState() ,将触发额外渲染,但此渲染会发生在浏览器更新屏幕之前。如此保证了即使在 render() 两次调用的情况下,用户也不会看到中间状态。谨慎使用该模式,因为它会导致性能问题。通常,在 constructor() 中初始化 state。如果渲染依赖于 DOM 节点的大小或位置,比如实现 modals 和 tooltips 等情况下,可以使用此方式处理。
getSnapshotBeforeUpdate
getSnapshotBeforeUpdate(prevProps, prevState) 在最近一次渲染输出(提交到 DOM 节点)之前调用。
- 使得组件能在发生更改之前从 DOM 中捕获一些信息(例如,滚动位置)。
- 此生命周期方法的任何返回值将作为参数传递给
componentDidUpdate()。
【Demo】以特殊方式处理滚动位置的聊天线程
class ExampleComponent extends React.Component {
  constructor(props) {
    super(props)
    this.listRef = React.createRef()
  }

  getSnapshotBeforeUpdate(prevProps, prevState) {
    // 判断 list 是否新增元素,捕获滚动位置以便稍后调整滚动位置
    if (prevProps.list.length < this.props.list.length) {
      const list = this.listRef.current
      return list.scrollHeight - list.scrollTop
    }
    return null
  }

  componentDidUpdate(prevProps, prevState, snapshot) {
    // 如果 snapshot 有值,说明添加了新的 items,
    // 调整滚动位置使得这些新 items 不会将旧的 items 推出视图。
    //(这里的 snapshot 是 getSnapshotBeforeUpdate 的返回值)
    if (snapshot !== null) {
      const list = this.listRef.current
      list.scrollTop = list.scrollHeight - snapshot
    }
  }

  render() {
    return <div ref={this.listRef}>{/* ...contents... */}</div>
  }
}
componentDidUpdate
componentDidUpdate(prevProps, prevState, snapshot) 会在更新后会被立即调用。首次渲染不会执行此方法。
- 当组件更新后,可以在此处对 DOM 进行操作。
- 对更新前后的
props进行了比较,也可以选择在此处进行网络请求。(例如,当props未发生变化时,则不会执行网络请求)。 - 在该生命周期中,可以调用
setState(),但需要注意必须被包裹在一个条件语句里,否则会导致死循环。 - 如果组件实现了
getSnapshotBeforeUpdate()生命周期,则它的返回值将作为componentDidUpdate()的第三个参数snapshot参数传递,否则此参数将为undefined。
注:如果 shouldComponentUpdate() 返回值为 false,则不会调用 componentDidUpdate()。
shouldComponentUpdate
当 props 或 state 发生变化时,shouldComponentUpdate(nextProps, nextState) 会在渲染执行之前被调用。
根据 shouldComponentUpdate() 的返回值,判断 React 组件的输出是否受当前 state 或 props 更改的影响。
- 返回为
true: 组件会被重新渲染,默认行为。 - 返回为
false: 组件不会被重新渲染,不会调用UNSAFE_componentWillUpdate(),render()和componentDidUpdate()。返回false并不会阻止子组件在state更改时重新渲染。
class ExampleComponent extends React.Component {
  shouldComponentUpdate(newProps, newState) {
    if (newProps.a !== this.props.a) {
      /* props中 a 属性发生变化,渲染组件 */
      return true
    } else if (newState.b !== this.props.b) {
      /* state 中 b 属性发生变化,渲染组件 */
      return true
    } else {
      /* 否则组件不渲染 */
      return false
    }
  }

  render() {
    return (
      <div>
        <div>Hello World!!!</div>
      </div>
    )
  }
}
此方法仅作为性能优化的方式而存在。不要企图依靠此方法来“阻止”渲染,因为这可能会产生 bug。应该考虑使用内置的 PureComponent 组件,而不是手动编写 shouldComponentUpdate()。React.PureComponent 会对 props 和 state 进行浅层比较,并减少了跳过必要更新的可能性。
后续版本,React 可能会将 shouldComponentUpdate() 视为提示而不是严格的指令,并且,当返回 false 时,仍可能导致组件重新渲染。
componentWillUnmount
componentWillUnmount() 会在组件卸载及销毁之前直接调用。
在此方法中执行必要的清理操作,例如,清除 timer,取消网络请求或清除在 componentDidMount() 中创建的订阅等。
UNSAFE_componentWillReceiveProps
注意
注:此生命周期之前名为 componentWillReceiveProps,React 已经不推荐使用,未来版本会被废弃。新方法名(UNSAFE_componentWillReceiveProps)在 React 16.9 和 React 17.x 中,仍可以继续使用。
可以使用 rename-unsafe-lifecycles codemod 将旧的生命周期方法名替换。例如 componentWillMount 会被替换为 UNSAFE_componentWillMount。
cd your_project
npx react-codemod rename-unsafe-lifecyclesUNSAFE_componentWillReceiveProps(nextProps)UNSAFE_componentWillReceiveProps(nextProps) 会在已挂载的组件接收新的 props 之前被调用。
- 如果需要更新状态以及响应
prop更改,可以比较this.props和nextProps,并在该方法中使用this.setState()执行state转换。 - 如果父组件导致组件重新渲染,即使
props没有更改,也会调用此方法。如果只想处理更改,请确保进行当前值与变更值的比较。 - 在挂载过程中,React 不会针对初始
props调用UNSAFE_componentWillReceiveProps()。 - 组件只会在组件的
props更新时调用此方法。调用this.setState()通常不会触发UNSAFE_componentWillReceiveProps()。
注意
使用此生命周期方法通常会出现 bug 和不一致性:
- 需要执行副作用(例如,数据提取或动画)以响应
props中的更改,可改用componentDidUpdate生命周期。 - 使用
componentWillReceiveProps仅在prop更改时重新计算某些数据,可使用 memoization helper 代替。 - 使用
componentWillReceiveProps是为了在prop更改时,“重置”某些state,可使用组件 完全受控 或 使用 key 使组件完全不受控 代替。
UNSAFE_componentWillMount
注意
注:此生命周期之前名为 componentWillMount,React 已经不推荐使用,未来版本会被废弃。新方法名(UNSAFE_componentWillMount)在 React 16.9 和 React 17.x 中,仍可以继续使用。
UNSAFE_componentWillMount()UNSAFE_componentWillMount() 在挂载之前被调用,它在 render() 之前调用。
- 在此方法中同步调用
setState()不会触发额外渲染。 - 建议使用
constructor()来初始化state。避免在此方法中引入任何副作用或订阅。如遇此种情况,请改用componentDidMount()。 - 此方法是服务端渲染唯一会调用的生命周期函数。
UNSAFE_componentWillUpdate
注意
注:此生命周期之前名为 componentWillUpdate,React 已经不推荐使用,未来版本会被废弃。新方法名(UNSAFE_componentWillUpdate)在 React 16.9 和 React 17.x 中,仍可以继续使用。
UNSAFE_componentWillUpdate(nextProps, nextState)当组件收到新的 props 或 state 时,会在渲染之前调用 UNSAFE_componentWillUpdate()。
- 使用此作为在更新发生之前执行准备更新的机会。
- 初始渲染不会调用此方法。
- 如果在此方法中读取 DOM 信息(例如,为了保存滚动位置),则可以将此逻辑移至
getSnapshotBeforeUpdate()中。
注:
- 不能此方法中调用
this.setState() - 在
UNSAFE_componentWillUpdate()返回之前,也不应该执行任何其他操作(例如,dispatchRedux 的action)触发对 React 组件的更新 - 如果
shouldComponentUpdate()返回false,则不会调用UNSAFE_componentWillUpdate()
函数组件生命周期
useEffect
useEffect(() => {
  // ... effect function
  return destroyCallback // destroy function
}, deps)- 第一个参数为 callback 回调函数 。可在回调函数中返回 destroyCallback 清除函数
- callback 回调函数 : 在组件渲染完毕之后执行的 effect (副作用)。默认情况下,effect 将在每轮渲染结束后执行。回到函数不会阻塞浏览器绘制视图。
- destroyCallback 清除函数 : 用于在行下一个 effect 之前,清除上一个 callback 回调函数产生的 effect 。通常应用于,组件卸载时,需要清除 effect 创建的诸如订阅或计时器 ID 等资源。
- 第二个参数作为 依赖项数组。只有当依赖项数组改变时,才会执行上一次 callback 回调函数返回的 destroyCallback 清除函数,和执行新的 effect (即:callback 回调函数)。
- 默认情况下,effect 会在每轮组件渲染完成后执行。
- 使用依赖项数组优化方式,需确保数组中包含了所有外部作用域中会发生变化且在 effect 中使用的变量,否则代码会引用到先前渲染中的旧变量。
- 如果只需要执行只运行一次的 effect(仅在组件挂载和卸载时执行),依赖项可传递为一个空数组(
[])
useEffect(() => {
  const subscription = props.source.subscribe()
  return () => {
    subscription.unsubscribe() // 清除订阅
  }
}, [props.source])
useEffect 回调函数 和 componentDidMount / componentDidUpdate 执行时机的区别:
useEffect对 React 执行栈来看是异步执行的,不会阻塞浏览器的绘制,而componentDidMount/componentDidUpdate是同步执行的。- 在执行时机上
,componentDidMount/componentDidUpdate和useLayoutEffect更类似。
useLayoutEffect
useLayoutEffect 和 useEffect 不同的地方是采用了同步执行
useLayoutEffect(() => {
  // ... effect function
  return destroyCallback // destroy function
}, deps)useLayoutEffect在 DOM 更新之后,浏览器执行绘制之前,其 callback 回调函数的更新计划会被同步执行。可使用它来读取 DOM 布局并同步触发重渲染,这样浏览器只会绘制一次。如果修改 DOM 布局放在
useEffect,那useEffect执行是在浏览器绘制视图之后,然后又改 DOM ,就可能会导致浏览器再次回流和重绘,视图上可能会造成闪现突兀的效果。useLayoutEffectcallback 回调函数中,代码执行会阻塞浏览器绘制。
对于 useEffect 和 useLayoutEffect 使用的选择:
- 修改 DOM ,改变布局使用
useLayoutEffect - 其他情况,使用
useEffect
useInsertionEffect
useInsertionEffect 在 DOM 更新之前执行。主要用于解决 CSS-in-JS 在渲染中注入样式的性能问题,避免了浏览器出现再次重回和重排的可能,解决了性能上的问题。
import { useLayoutEffect, useInsertionEffect, useEffect } from 'react'

function ExampleComponent() {
  useEffect(() => {
    console.log('useEffect')
  }, [])

  useLayoutEffect(() => {
    console.log('useLayoutEffect')
  }, [])

  useInsertionEffect(() => {
    console.log('useInsertionEffect')
  }, [])

  return <div>ExampleComponent</div>
}

// 执行顺序如下:
// useInsertionEffect - 在所有 DOM 突变之前同步触发
// useLayoutEffect - 在 DOM 更新之后,浏览器执行绘制之前执行
// useEffect - 在组件渲染完毕之后执行
CSS-in-JS 的实现原理,以 Styled-components 为例:
- 通过 styled-components,可以使用 ES6 的标签模板字符串语法(Tagged Templates)为需要 styled 的 Component 定义一系列 CSS 属性。
- 当该组件的 JS 代码被解析执行的时候,styled-components 会动态生成一个 CSS 选择器,并把对应的 CSS 样式通过 style 标签的形式插入到 head 标签里面。
- 动态生成的 CSS 选择器会有一小段哈希值来保证全局唯一性来避免样式发生冲突。
- 这种模式下,本质上是动态生成 style 标签。
在 useLayoutEffect 中,使用 CSS-in-JS 带来的性能问题:
- 在 useLayoutEffect 中,此时 DOM 已经更新完成,布局也已经确定,只需要进行浏览器绘制。
- 使用 CSS-in-JS 动态生成 style 标签,则会再次影响布局,导致浏览器再次重回和重排。
function ExampleComponent() {
  useInsertionEffect(() => {
    /* 动态创建 style 标签插入到 head 中 */
    const style = document.createElement('style')
    style.innerHTML = `
       .css-in-js{
         color: red;
         font-size: 20px;
       }
     `
    document.head.appendChild(style)
  }, [])

  return <div className="css-in-js">ExampleComponent</div>
}
注意
useInsertionEffect 应仅限于 css-in-js 库作者使用。优先考虑使用 useEffect 或 useLayoutEffect 来替代。
Hooks 替代生命周期方案
componentDidMount 替代方案
useEffect 依赖项数组为空数组([]),只会执行一次的 effect(副作用),仅在组件挂载和卸载时执行。
useEffect(() => {
  /* 可进行请求数据、事件监听、操纵 DOM、增加定时器,延时器 */
}, []) /* 注意:依赖项数组 deps = [] */
componentWillUnmount 替代方案
在 componentDidMount 的前提下,useEffect 第一个参数 callback 回调函数 的返回函数(即:destroyCallback 清除函数),可以作为 componentWillUnmount 使用。用于在行下一个 effect 之前,清除上一个 callback 回调函数产生的 effect 。通常应用于,组件卸载时,需要清除 effect 创建的诸如订阅或计时器 ID 等资源。
useEffect(() => {
  /* 可进行请求数据、事件监听、操纵 DOM、增加定时器或延时器 */
  return function componentWillUnmount() {
    /* 解除事件监听器、清除定时器或延时器 */
  }
}, []) /* 注意:依赖项数组 deps = [] */
componentWillReceiveProps 替代方案
useEffect 与 componentWillReceiveProps 的区别:
- 两者的执行阶段根本不同。
useEffect是在render阶段,componentWillReceiveProps是在commit阶段。 useEffect会初始化执行一次,但是componentWillReceiveProps只有组件更新 props 变化的时候才会执行。
// 依赖项 props 变化,执行 effect ,模拟 componentWillReceiveProps
useEffect(() => {
  // ... effect function
}, [props])

// 可以针对 props 中的某一个属性进行追踪
// 当前仅当 props 中的 number 属性变化,执行当前 effect
useEffect(() => {
  // ... effect function
}, [props.number])
componentDidUpdate 替代方案
useEffect 和 componentDidUpdate 的区别:
useEffect是异步执行,componentDidUpdate是同步执行 ,但都是在commit阶段。useEffect会默认执行一次,而componentDidUpdate只有在组件更新完成后执行。
// 组件更新完成,执行当前 effect
useEffect(() => {
  // ... effect function
}) /* 注意:没有依赖项数组 deps */
Hooks 模拟生命周期示例
import { useState, useEffect } from 'react'

function FunctionLifecycle(props) {
  const [num, setNum] = useState(0)
  useEffect(() => {
    /* 可进行请求数据、事件监听、操纵 DOM、增加定时器,延时器 */
    console.log('组件挂载完成,模拟 【componentDidMount】')
    return function componentWillUnmount() {
      /* 解除事件监听器 ,清除定时器,延时器 */
      console.log('组件销毁,模拟 【componentWillUnmount】')
    }
  }, []) /* 注意:依赖项数组 deps = [] */

  useEffect(() => {
    console.log('props 变化,模拟 【componentWillReceiveProps】')
  }, [props])

  useEffect(() => {
    console.log('组件更新完成,模拟 【componentDidUpdate】 ')
  })

  return (
    <div>
      <div> props : {props.number} </div>
      <div> states : {num} </div>
      <button onClick={() => setNum(state => state + 1)}>改变 state</button>
    </div>
  )
}

function ExampleComponent() {
  const [number, setNumber] = useState(0)
  const [isRender, setRender] = useState(true)
  return (
    <div>
      {isRender && <FunctionLifecycle number={number} />}
      <button onClick={() => setNumber(state => state + 1)}>改变 props</button>
      <button onClick={() => setRender(false)}>卸载组件</button>
    </div>
  )
}
ScrollView 组件
ScrollView 组件 Demo
import React, { useState, useEffect } from 'react'
import { debounce } from 'lodash'

class ScrollView extends React.Component {
  /* ========== 自定义事件 ========== */
  /* 控制滚动条滚动 */
  handlerScroll = e => {
    const { scroll } = this.props
    scroll && scroll(e)
    this.handlerScrollToLower()
  }
  /* 判断滚动条是否到底部 */
  handlerScrollToLower() {
    const { scrollToLower } = this.props
    const { scrollHeight, scrollTop, offsetHeight } = this.node
    if (scrollHeight === scrollTop + offsetHeight) {
      /* 到达容器底部位置 */
      scrollToLower && scrollToLower()
    }
  }
  node = null

  /* ========== 生命周期 ========== */
  constructor(props) {
    super(props)
    this.state = {
      list: [] /* 初始化 Data */,
    }
    this.handlerScrollToLower = debounce(
      this.handlerScrollToLower,
      200
    ) /* 防抖处理 */
  }
  /* 接收 props, 合并到 state */
  static getDerivedStateFromProps(newProps) {
    const { data } = newProps
    return {
      list: data.list || [],
    }
  }
  /* 性能优化,只有列表数据变化,渲染列表 */
  shouldComponentUpdate(newProps, newState) {
    return newState.list !== this.state.list
  }
  /* 获取更新前容器高度 */
  getSnapshotBeforeUpdate() {
    return this.node.scrollHeight
  }
  /* 获取更新后容器高度 */
  componentDidUpdate(prevProps, prevState, snapshot) {
    console.log('scrollView容器高度变化:', this.node.scrollHeight - snapshot)
  }
  /* 绑定事件监听器 - 监听scroll事件 */
  componentDidMount() {
    this.node.addEventListener('scroll', this.handlerScroll)
  }
  /* 解绑事件监听器 */
  componentWillUnmount() {
    this.node.removeEventListener('scroll', this.handlerScroll)
  }
  render() {
    const { list } = this.state
    const { component } = this.props
    return (
      <div className="scroll-view" ref={node => (this.node = node)}>
        <div>
          {list.map(
            item => React.createElement(component, { item, key: item.id }) // 渲染 Item 列表内容
          )}
        </div>
      </div>
    )
  }
}

/* Item 完全是单元项的渲染 UI */
function Item({ item }) {
  return (
    <div className="goods_item">
      <img src={item.giftImage} className="item_image" />
      <div className="item_content">
        <div className="goods_name">{item.giftName}</div>
        <div className="hold_price" />
        <div className="new_price">
          <div className="new_price">
            <div className="one view">¥ {item.price}</div>
          </div>
        </div>
        <img className="go_share go_text" />
      </div>
    </div>
  )
}

function ExampleComponent() {
  const [data, setData] = useState({
    list: [],
    page: 0,
    pageCount: 1,
  }) /* 记录列表数据 */

  /* 请求数据 */
  const getData = async () => {
    if (data.page === data.pageCount) return console.log('没有数据了~')
    const res = await fetchData(data.page + 1)
    if (res.code === 0)
      setData({
        ...res,
        list: res.page === 1 ? res.list : data.list.concat(res.list),
      })
  }

  /* 滚动到底部触发 */
  const handlerScrollToLower = () => {
    console.log('scroll已经到底部')
    getData()
  }

  /* 初始化请求数据 */
  useEffect(() => {
    getData()
  }, [])

  return (
    <ScrollView
      data={data}
      component={Item} /* Item 渲染的单元组件 */
      scrollToLower={handlerScrollToLower}
      scroll={() => {}}
    />
  )
}

export default ExampleComponent